Cutting Practice Worksheets
Dashed lines from a scissors icon to a star: snips, straight lines, zigzags, curves, spirals and shapes, from easy to hard.
Cutting practice worksheets are printable pages with thick dashed lines that a child follows with scissors. This free tool makes them in your web browser, with no sign-up needed. You choose the type of cut, such as straight lines, zigzags, curves, or shapes, and how hard the path is. Each page gives the child a set of cuts to finish, so you can match the sheet to where your child is now and move to harder lines over time. The pages suit preschool and kindergarten children, and older children who are still building scissor control.
Whatever you call them (cutting practice pages, cut practice sheets, cutting work sheets or, in British English, cutting practise sheets), each page here is a cutting practice printable you make to measure: pick the cuts, print, and hand over the scissors. Nothing you make is uploaded or sent to a server.
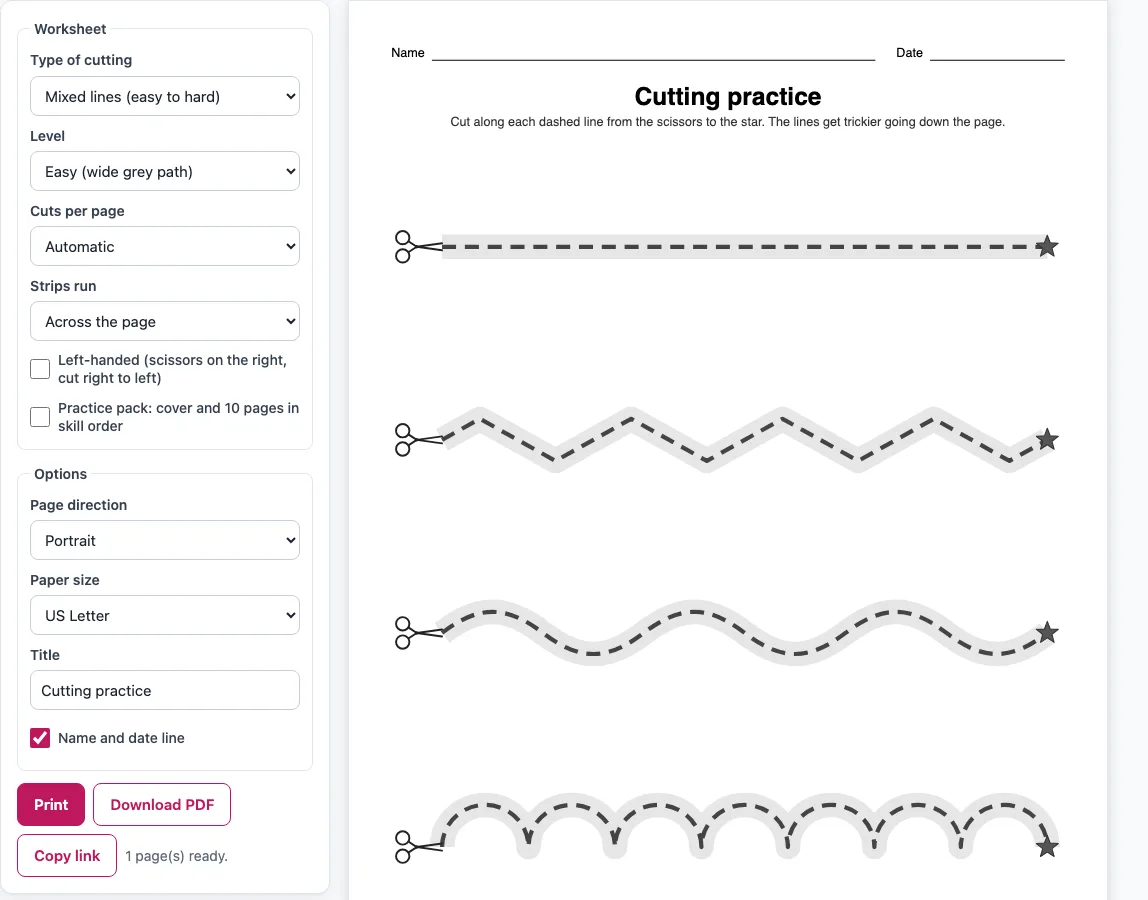
How to make cutting practice worksheets
- Choose the type of cutting. Start with Fringe snips, the first scissor skill, or pick Mixed lines (easy to hard) for a range of cuts on one sheet.
- Set the level. Easy has a wide grey path, so a cut slightly off the line still counts. Medium has a narrow path, and Hard shows only the thin line.
- Set the cuts per page. Automatic gives 4, 5, or 7 cuts for Easy, Medium, or Hard (or 4, 6, or 8 shapes), or you can pick a fixed number from 3 to 8.
- For zigzag, waves, curves, castle, or mixed lines, choose the strip direction: Across the page or Down the page.
- Choose the paper size (US Letter or A4) and the orientation (Portrait or Landscape). The preview updates as soon as you change a setting.
- Edit the title (it starts as “Cutting practice”) and switch the Name and date line on or off.
- For a left-handed child, tick the Left-handed box. The sheet mirrors so the scissors sit on the right and cuts run right to left.
- For a full set, tick “Practice pack: cover and 10 pages in skill order” (it uses your chosen level).
- Click Print to open the browser’s print dialog with only the worksheet pages. Click Download PDF for a file that prints at true size, or Copy link to copy a link that reopens the same settings.
What is the order of scissor skills?
The usual order starts with opening and closing scissors, then snipping, then cutting a straight line, then a line with corners (zigzag and castle), then curves and waves, then simple shapes, then shapes with curves and points, and last, spirals. Each skill builds on the one before it. On these sheets each cut line has a small scissors drawing at the start and a star at the end, so your child knows where to begin and finish. Each page keeps at least 12 mm margins, and the cut lines stop at the margin, so your child finishes the cut to the edge of the paper. First the child learns to control the blades, then to keep the cut on a path, then to turn the paper while cutting.
Snipping comes early because it uses short, controlled cuts from the edge of a strip, which teaches the child to open and close the scissors fully. Straight lines come next, and they ask for a steady, long cut. Zigzags and castle lines add corners, so the child must stop, turn the paper, and keep going. Curves and waves need slow, smooth turns of the paper. Cutting out a simple shape asks the child to follow a full closed outline, and shapes with curves and points are harder because the direction changes often. Spirals come last, since the child cuts out a circle and then works round and round the spiral to the star in the middle.
The Practice pack follows this same order, so you can use it as a guide for what to practise next.
At what age can children use scissors?
Many children begin snipping around age 2 to 3, straight lines usually come around age 3 to 4, and simple shapes often come around age 4 to 5. Ages vary a lot, so use the skill order rather than the birthday. If your child snips well, move on to lines. If lines are hard, go back to snipping and try again later.
Whatever the age, use child-safe scissors and keep an adult nearby during every cutting session.
Which cutting activities suit preschoolers?
For cutting practice in preschool, start with Fringe snips on Easy: short cuts from the edge of a strip that a three-year-old can finish in one snap. Then move to straight lines and gentle waves on Easy, where the wide grey path forgives a wobbly cut. These cutting sheets for preschool work best as short cut activities: one page, a few minutes, a star at the end of each line. The same settings give cut worksheets for preschool groups and cutting printables for preschoolers at home; kindergarten children can usually move on to Medium, castle lines and cut-out shapes. Scissor cutting along a printed line is only one of many cutting activities, but it is the one that shows a child, and an adult, exactly how close the cut came.
The sheets are free to use at home, in class or in products you sell, such as Etsy printables or KDP activity books.
Frequently asked questions
How do you teach a child to cut with scissors?
Start with a strip of paper and a pair of child-safe scissors, and show one cut at a time. Ask your child to open the scissors wide and take long, steady cuts rather than small chopping ones. Keep sessions short and praise each cut, even the uneven ones, so your child stays interested.
How do I hold the paper and scissors?
Put your thumb in the small hole of the scissors and your fingers in the big one, and keep the thumb on top, in the “thumbs up” position. Keep your elbow close to your body. Your other hand holds the paper and turns it as you cut, so the scissors stay in one steady place. Let the paper do the turning, not the blades.
Are there cutting sheets for left-handed children?
Yes. Tick the Left-handed (scissors on the right, cut right to left) checkbox, and the sheet mirrors so the scissors sit on the right. Shapes are cut clockwise on the mirrored sheet.
Is it free?
Yes. The tool is free, needs no sign-up, and nothing you make is uploaded or sent to a server.
What do the Easy, Medium, and Hard levels change?
Easy adds a 7 mm light-grey path around each line, so a cut slightly off the line still counts. Medium uses a narrower 4 mm path, and Hard shows only the thin line with no path. Easy also has gentler, wider zigzags and waves, while Hard has tighter ones. The line width changes too, from 1.2 mm on Easy to 0.8 mm on Hard.
Can I sell cutting practice sheets on Etsy or in a KDP book?
Yes. The sheets you make are royalty-free for personal, classroom and commercial use, including Etsy printables, Teachers Pay Teachers, KDP activity books and print-on-demand. No credit is required, and the only thing you may not do is copy the generator itself to run a competing service.
Related tools
- Tracing lines worksheets: Use these when your child needs practice guiding a pencil along straight and curved lines before using scissors.
- Pre-writing worksheets: Use these to build the hand control and pencil grip that also support cutting.
- Shape tracing worksheets: Use these when your child is learning shapes and needs to trace their outlines first.
- Preschool tracing pack: Use this pack for a set of tracing pages suited to preschool children.
- Tracing for 3 year olds: Use these for the youngest children who are just starting to follow lines.
- Trace and color worksheets: Use these for a mix of tracing and coloring when your child wants a change from cutting.
- Pumpkin trace (Halloween tracing): Use this for a seasonal tracing page when you want a themed activity in autumn.